

Knowing the Turbo S was living out its last year in production, we ordered one up from Polaris to put a short build together to say farewell to one of our favorite UTVs of all time. Here’s are Polaris RZR Turbo S Final Build.
PROJECT BITTERSWEET: AN END TO AN ERA
Giving a fond farewell to Polaris’ RZR Turbo S with a UTV Off-Road twist.

Words: Cody Hooper // Photos: Cody Hooper/Brad Howe

Polaris has done a massive amount of work to push the UTV industry along. Think back to 2008, when the first model year RZR 800 was released. 50 inches wide, 50-ish horsepower, and under 10 inches of suspension travel seem like laughable numbers now, but back then, the RZR 800 was king of the trail. Polaris began dropping faster, wider, better-suspended models like clockwork afterwards- 2009 brought us the mid-travel RZR S 800. Just two years later, Polaris unveiled an all-new RZR XP 900, now sporting trailing arms instead of the S model’s A-arms out back and a bigger, dual overhead cam engine. The jump in trail speed between a RZR S 800 and the XP 900 was astonishing, but Polaris was just getting started.
In 2014, Polaris blessed the world with the RZR XP 1000. This freshly redesigned car was wholly larger than the XP 900, and offered an all-new interior and body design that brought some freshness to the RZR line. This chassis evolved a few more times: starting in 2016, Polaris introduced a RZR Turbo with 144 horsepower, which was soon updated to put out 168 horsepower. Then, in 2018, just four short years ago, Polaris released the XP chassis’ swan song: the Turbo S.
The XP Turbo S was met with open arms by the public. Offering the industry’s first answer to Can-Am’s long-travel Maverick X3 X RS, RZR Turbo S models flew off dealership lots in a hurry. Our first outings behind the wheel of the Turbo S were full of grins, and it proved to be the toughest, most well-suspended RZR of this chassis to date. The Turbo S met the end of its life cycle in 2021, as Polaris is transitioning to the new RZR Pro cars. The Turbo S’ replacement, the RZR Turbo R 4, is nearly 10 inches longer and 300 pounds heavier. We have yet to get the chance to drive one, but we expect it won’t feel quite as agile as the Turbo S 4.
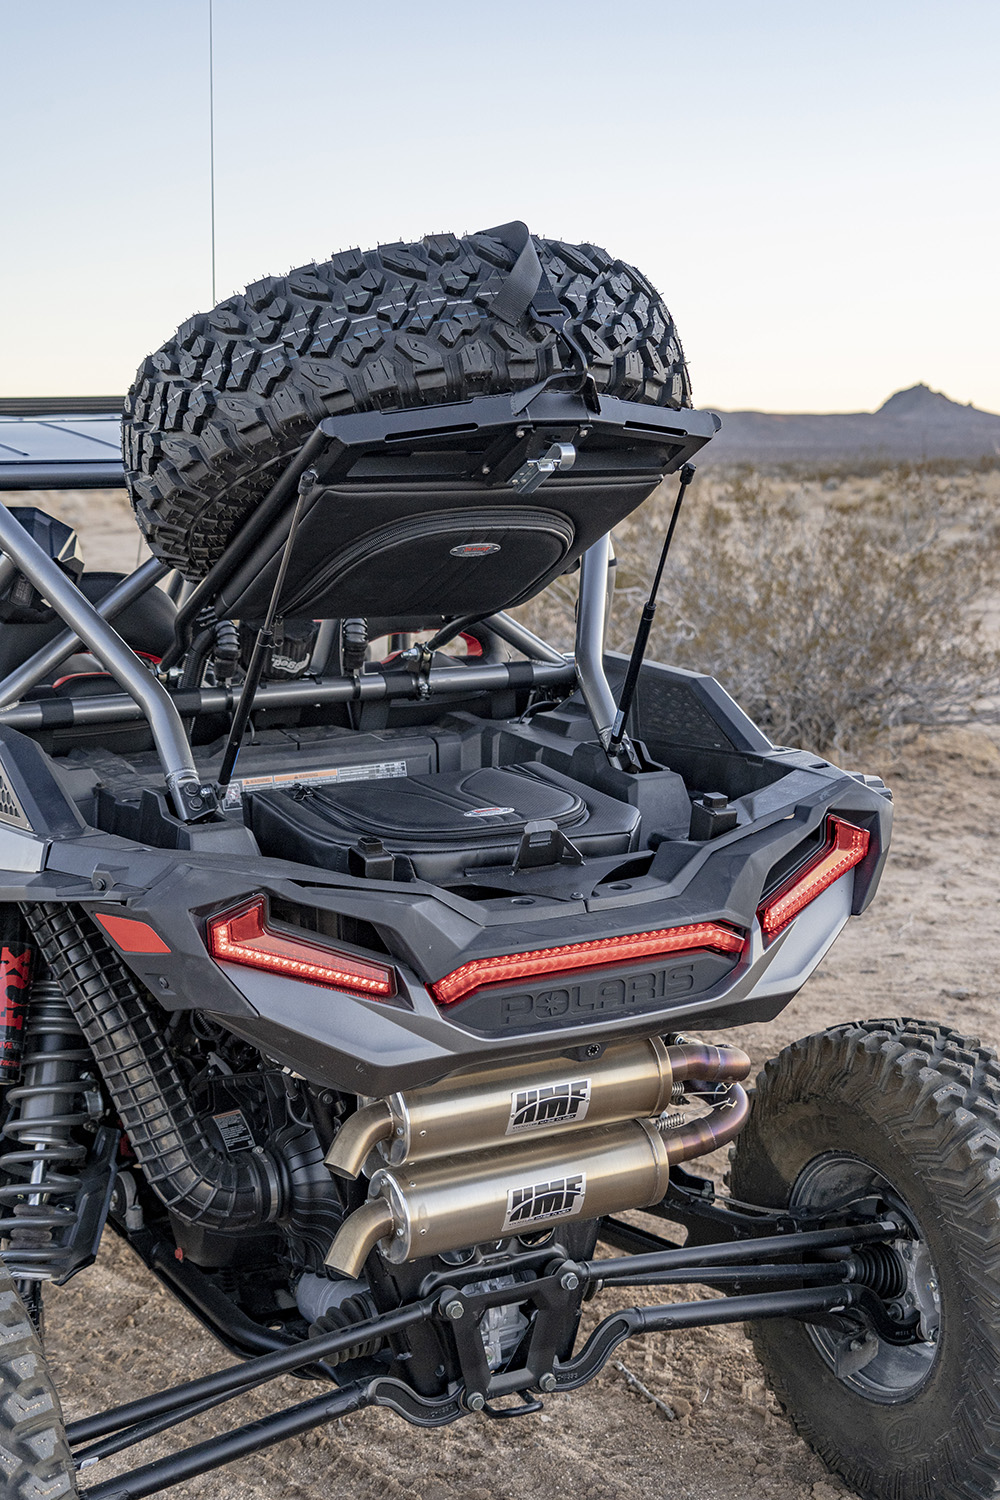
Knowing the Turbo S was living out its last year in production, we ordered one up from Polaris to put a short build together to say farewell to one of our favorite UTVs of all time. The Onyx Black Turbo S 4 we received came equipped with Ride Command and Dynamix suspension, occupying the top spot in Polaris’ RZR line before the introduction of the Pro R and Pro Turbo. For this build, we focused on safety, storage and comfort features to round out the Turbo S’ already stellar engine and chassis performance. Let’s start with the only performance modification- HMF’s Titan Dual exhaust.
HMF has been making exhaust systems for decades, and we have a lot of experience with their product. HMF’s Titan series slip-on system is a perfect fit for the Turbo S, as it doesn’t make the car any louder than the stock muffler. In fact, it matches the RZR’s OEM muffler for measured sound output, but increases the quality of the tone by miles. Where the stock RZR muffler sounds tinny and raspy, HMF’s Titan duals emit a low rumble that transitions into an incredible, snappy roar under heavy throttle. The quiet nature of the exhaust means that even with the increased sound quality, the exhaust tone never gets tiring during long days on the trail.

As good as the Turbo S is in stock form, the comfort and ergonomic features are easily upgraded to fit the vehicle to your liking. We ordered all of our parts for the RZR build and then stripped the car down to the frame rails in order to lay all of our wiring in. We removed and stored the stock roof, cage, doors, MB Quart speakers, Rockford Fosgate amplifier for the onboard stereo, seats, harnesses, glovebox, in-dash storage box and steering wheel, as they were all being replaced with upgraded parts.
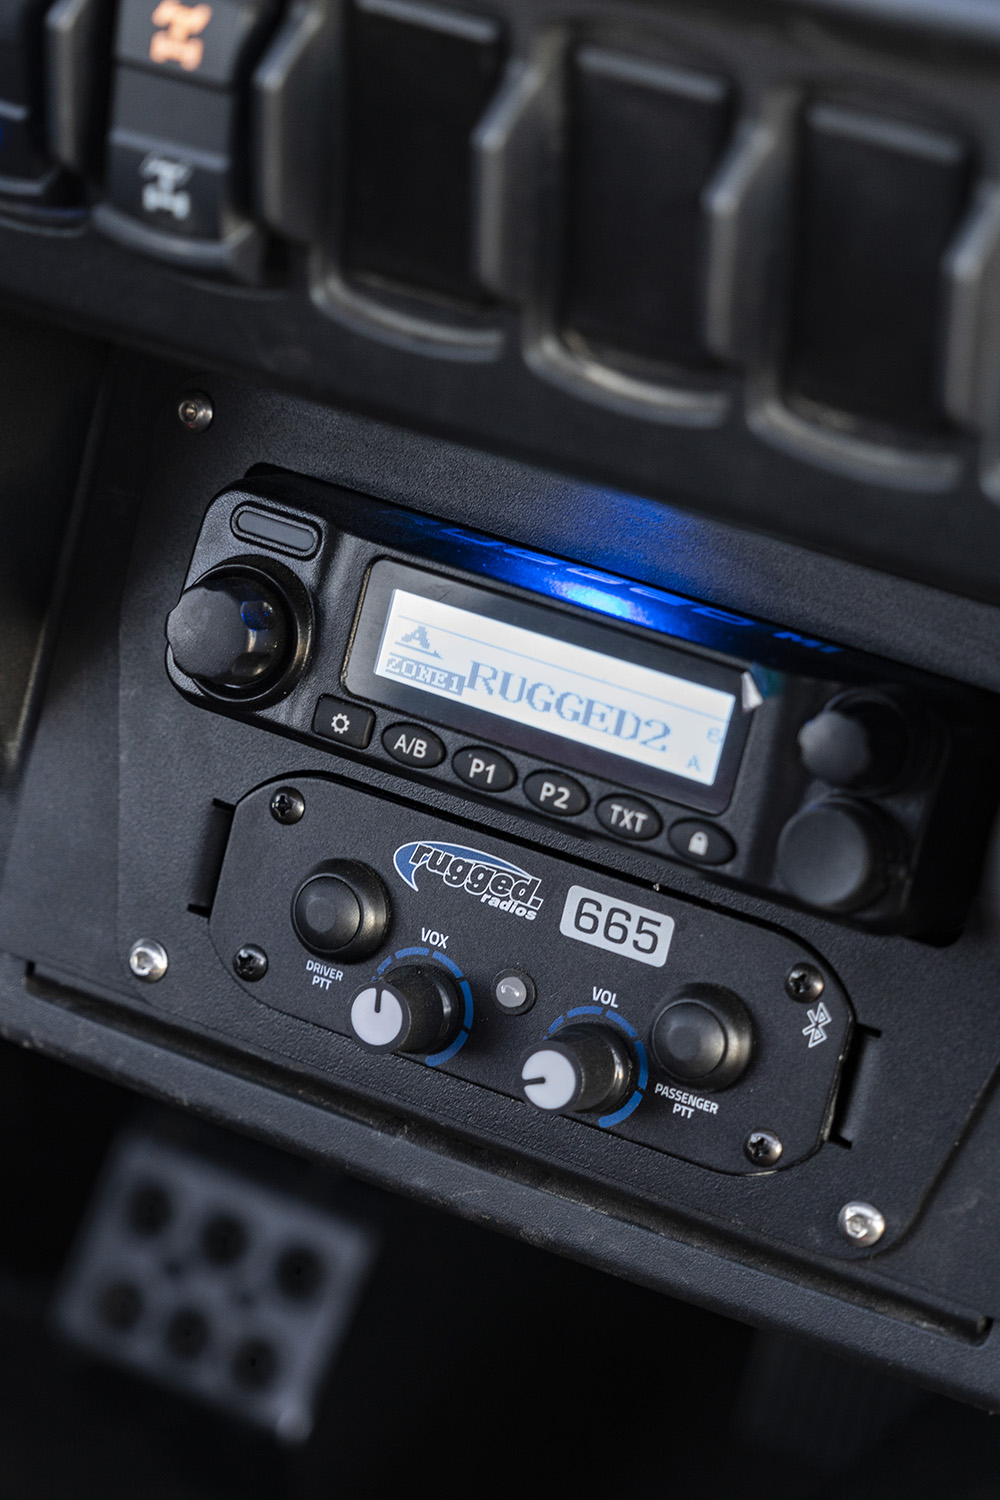
With the RZR Turbo S 4 opened up, we began laying in the wiring for our Rugged Radios M1 Radio and 665 intercom communications package and SSV Works RZ4-5ARC 5-speaker stereo kit. We installed the Rugged radio and intercom first, starting with their in-dash mount. Replacing the small storage box above the cup holders in the RZR is a nicely-fitting powdercoated steel bracket that house the radio and intercom. The bracket has a mount insert that makes radio and intercom removal in the future very quick, as the mount itself stays in place.
Rugged provides everything needed for a 2 or 4 seat UTV communications package in one box. Installation is incredibly simple- run the power and ground cables to the battery and route the antenna up onto the roof or a cage-mounted clamp, keeping the antenna cable away from other electrical sources or wires to prevent interference. Then, run the intercom cables under the plastic to the four seats, place your push to talk buttons, and plug everything together. Rugged makes installation simple by providing a true plug and play kit, where no wiring, soldering, or crimping is required.
We opted to go with Rugged’s Bluetooth RRP665 intercom instead of their standard RRP696, as the 665 features built-in push to talk buttons on the intercom faceplate. This cleans up the install a bit by removing the need for a separate PTT, but one can also be plugged in and used in conjunction if you prefer a steering-wheel mounted button. Rugged’s Bluetooth intercom pairs with the Polaris Ride Command system, allowing you to toggle audio output from the speakers to your helmet or headsets with the push of a button.
Rugged shipped us their new waterproof M1 Race Radio with this kit, which is a VHF analog and digital radio pre-programmed with a variety of popular channels used by riders in the southwest states. Rugged also offers GMRS UTV radio kits for those who operate on GMRS/FRS channels as well. Their new M1 radio features crystal-clear voice communications and incredible range thanks to its 55 watt rating. Rugged’s communication system was simple to install and has worked flawlessly every trip. We will provide a more in-depth review of the Rugged M1 communications kit in an upcoming issue.
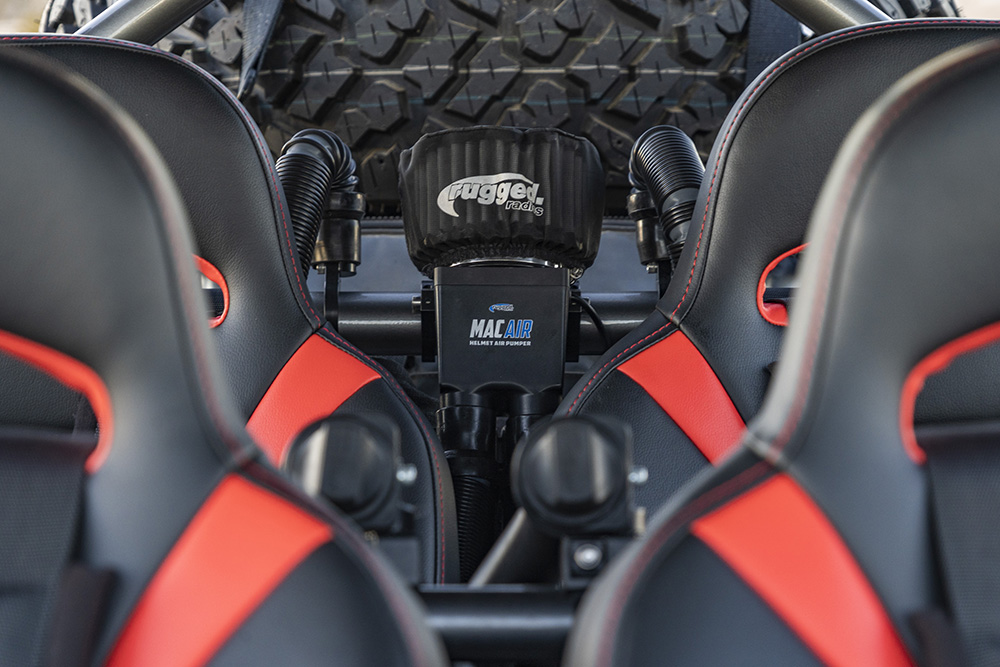
To pair with the communications package, we also opted for Rugged’s Mac-4P helmet air system. This small, filtered blower pressurizes the RZR occupants’ helmets slightly, pumping air into the helmet from a clean source to keep dust from entering your lid. This system absolutely transforms riding in dusty situations; while it cannot remove the dust from the trail, it certainly removes it from the inside of your helmet. It has the added benefit of cooling your head on hot days, and Rugged includes a variable speed controller with the pumper kits to allow adjustment of fan speed.
The helmet air attaches to the helmet via a small push-fit hose connection, so a pumper-style helmet must be used in conjunction with the system. Rugged offers pumper helmets at multiple price points, starting at $295 for a Bell Qualifier, which comes pre-wired for Rugged communications and includes an inlet for pumper systems. We finished out our Rugged installation with their Mac-XC magnetic hose attachment accessories, which relocate the pumper hookup to a magnetic receiver that you mount on any roll bar. This makes attaching and detaching the pumper much quicker, and saves the frustration of having to fight the press-fit connections.

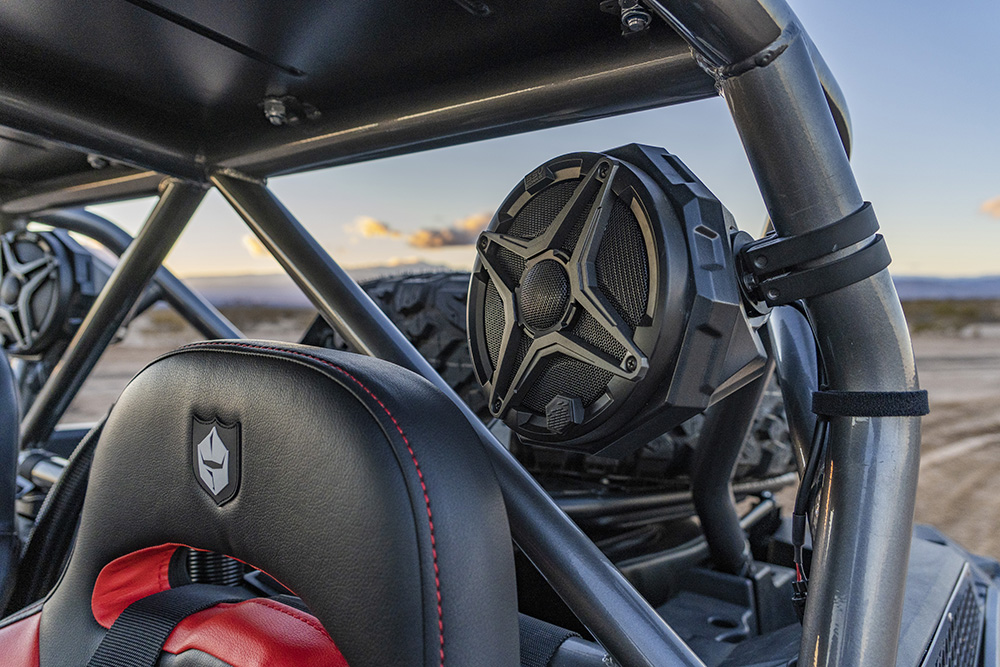
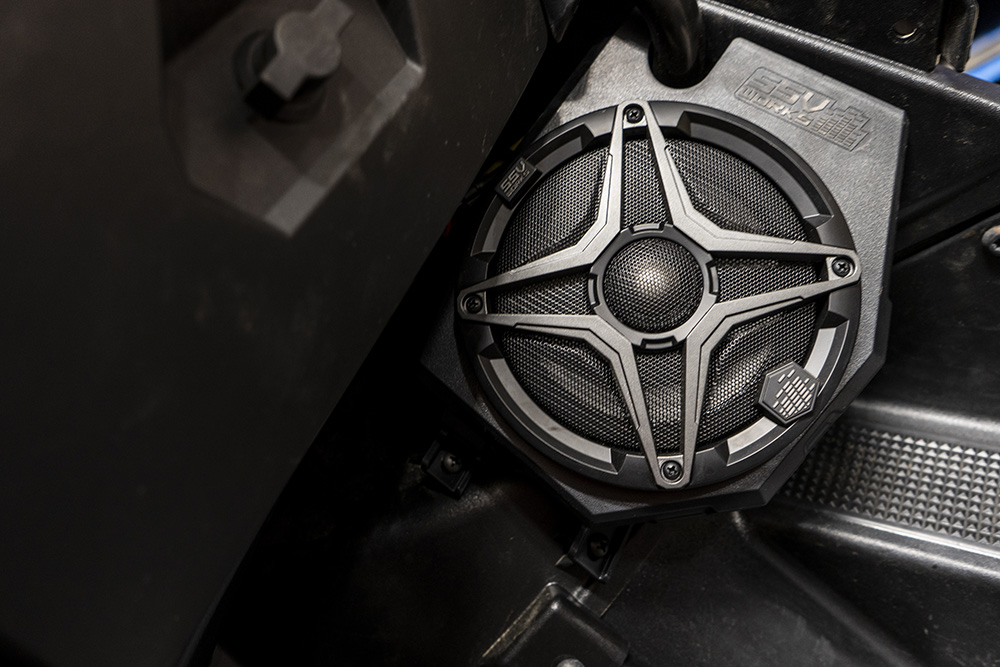
Next up to install was our SSV Works 5-speaker Plug-&-Play system for Ride Command. SSV includes everything you need to crank up the RZR’s stereo system, including a plug and play wiring harness that only requires a bolt-in installation. Starting at the front, SSV Works includes a pre-built and wired amp tray that bolts in nicely under the RZR’s dash. Since our model came with a basic MB Quart stereo, we removed all of the stock stereo equipment and plugged SSV’s kit right in. All of the connectors clip right into the factory harness, and the SSV kit functions like the OE audio, only with drastically increased sound quality.
After the amp tray was installed, we bolted in SSV’s replacement glove box subwoofer, which features an independently amplified 10-inch kicker subwoofer which bolted right up without issue. The glovebox door gets reused, as SSV spared you enough room for your registration documents and a pair of gloves. Below the glovebox woofer, a pair of injection-molded kick panel speakers get bolted in under the dash. SSV’s speaker pods are slim and well made, looking like a factory option when bolted into the RZR. Wiring is simple, with plug and play connectors at every speaker.
Out back, the speaker installation is also simple. Cage-mounted speaker pods use dual band clamps to secure, and another plug and play harness runs back to the two rear speakers. Once the stereo is mounted and cabled, all there is left to do is hook up the power cables. SSV includes their own brand of 6.75-inch marine-rated speakers, all of which include 25mm titanium hard dome tweeters for crisp sound. SSV has multiple speaker grill color options available to color-match to your rig as well. With no cutting or wiring required, the SSV Works stereo install was one of the easier parts of the build. Sound quality is excellent, and all Ride Command features work without a hitch. The stereo is loud enough to be heard at speed with helmets on, but at high speeds, we preferred to hit the switch and port the audio right into the helmets.
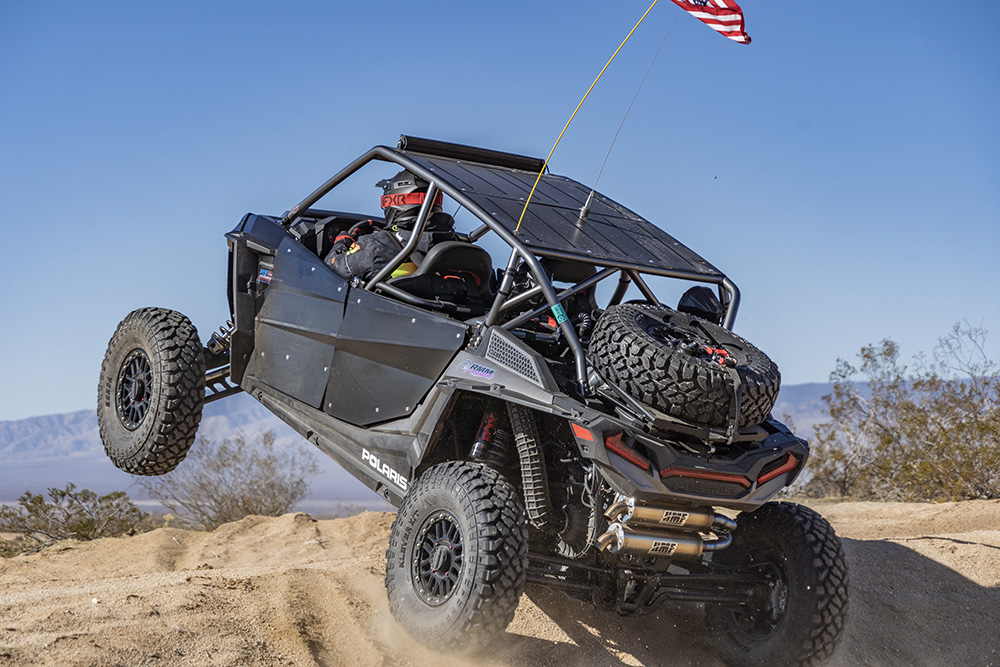
After we had the electronics handled, we moved on to safety and comfort features. We reached out to Southern California natives SDR Motorsports for help with the build, and they supplied a host of product to polish this Turbo S 4 into a real head-turner. We started with their Sport Shorty cage in anthracite grey, with a matte black roof and no intrusion bar for a clean look. We didn’t plan on racing the Turbo S, so building this towards a weekend play car the average reader would enjoy was the goal.
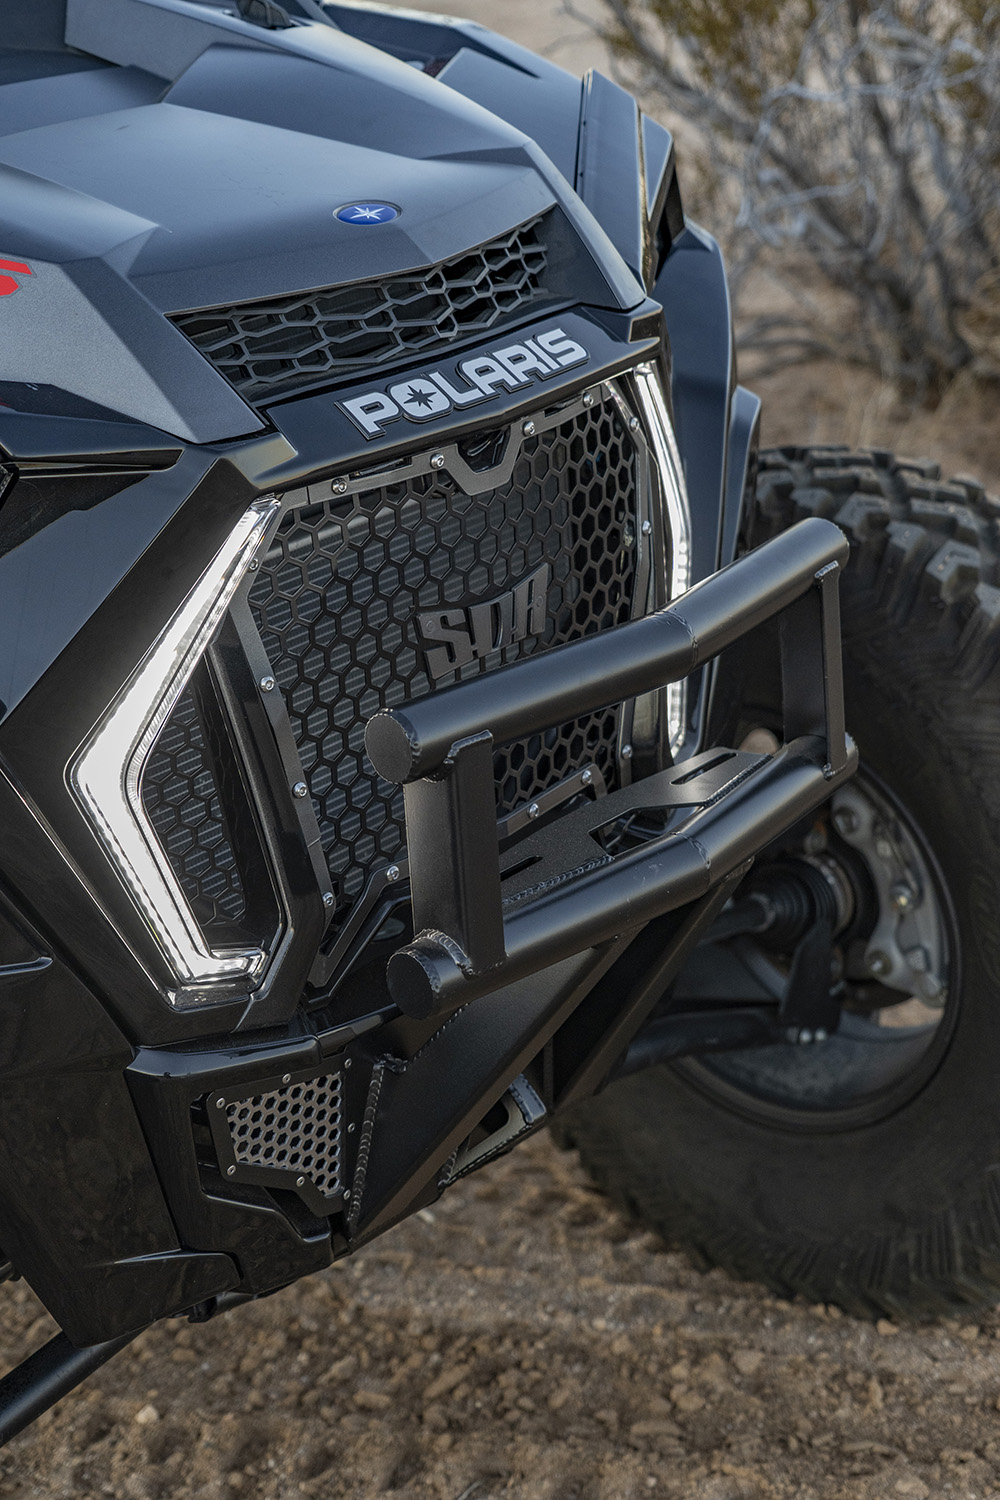
We also ordered a full set of SDR Hi-Bred doors, storage bags, grille kits, a Baja series front bumper, and their rear adventure rack and tire carrier. Installing a cage on any UTV is always quite a task, as not all UTVs are built alike. We have swapped cages on many cars, and sometimes, the frames just don’t line up perfectly. SDR’s cage fit well, but it took some massaging to get it onto our Turbo S. The same went for the doors – while the end product looks very slick, the installation is very time consuming and requires a lot of patience to get the gaps and door alignment proper. Be prepared to spend some time on the install if you’re attempting it at home, as there are a lot of places where small adjustments matter.


The easiest part of the SDR portion of our build to install was the rear adventure rack, which has a gas-strut assisted lift feature that allows you to mount a spare tire over your cargo bed while still retaining easy access. We mounted in dual SDR storage bags to hold a spare belt, clutch tools, an impact wrench, tool kit, first aid kit, and spare jacket. The SDR bed bag leaves the air filter access door completely unobstructed, which was a great design feature. It also allows you to tuck a cooler in front of the storage bag and then close the spare tire rack, keeping the cooler in place and out of harm’s way. The top of the spare tire rack has plenty of holes should you choose to mount gear to it instead of a spare tire. SDR’s adventure rack will fit up to a 35-inch spare tire, and the gas struts make lifting the 32-inch spare we run easy work.
Storage was a focus on this build, but we didn’t want to go overboard. Keeping a UTV light is one of the best things you can do for performance. We chose to use SDR’s dual-pocket door bags on all four doors to complement the dual rear cargo bag setup. The bags are very high quality, made from a carbon-fiber textured marine-grade vinyl and even include velcro stays so the zippers stay put. They are made to fit the SDR doors, installing with velcro straps and plastic push-rivets for a tight fit. Door bags are an absolute necessity for any UTV owner, regardless of which vehicle they own!
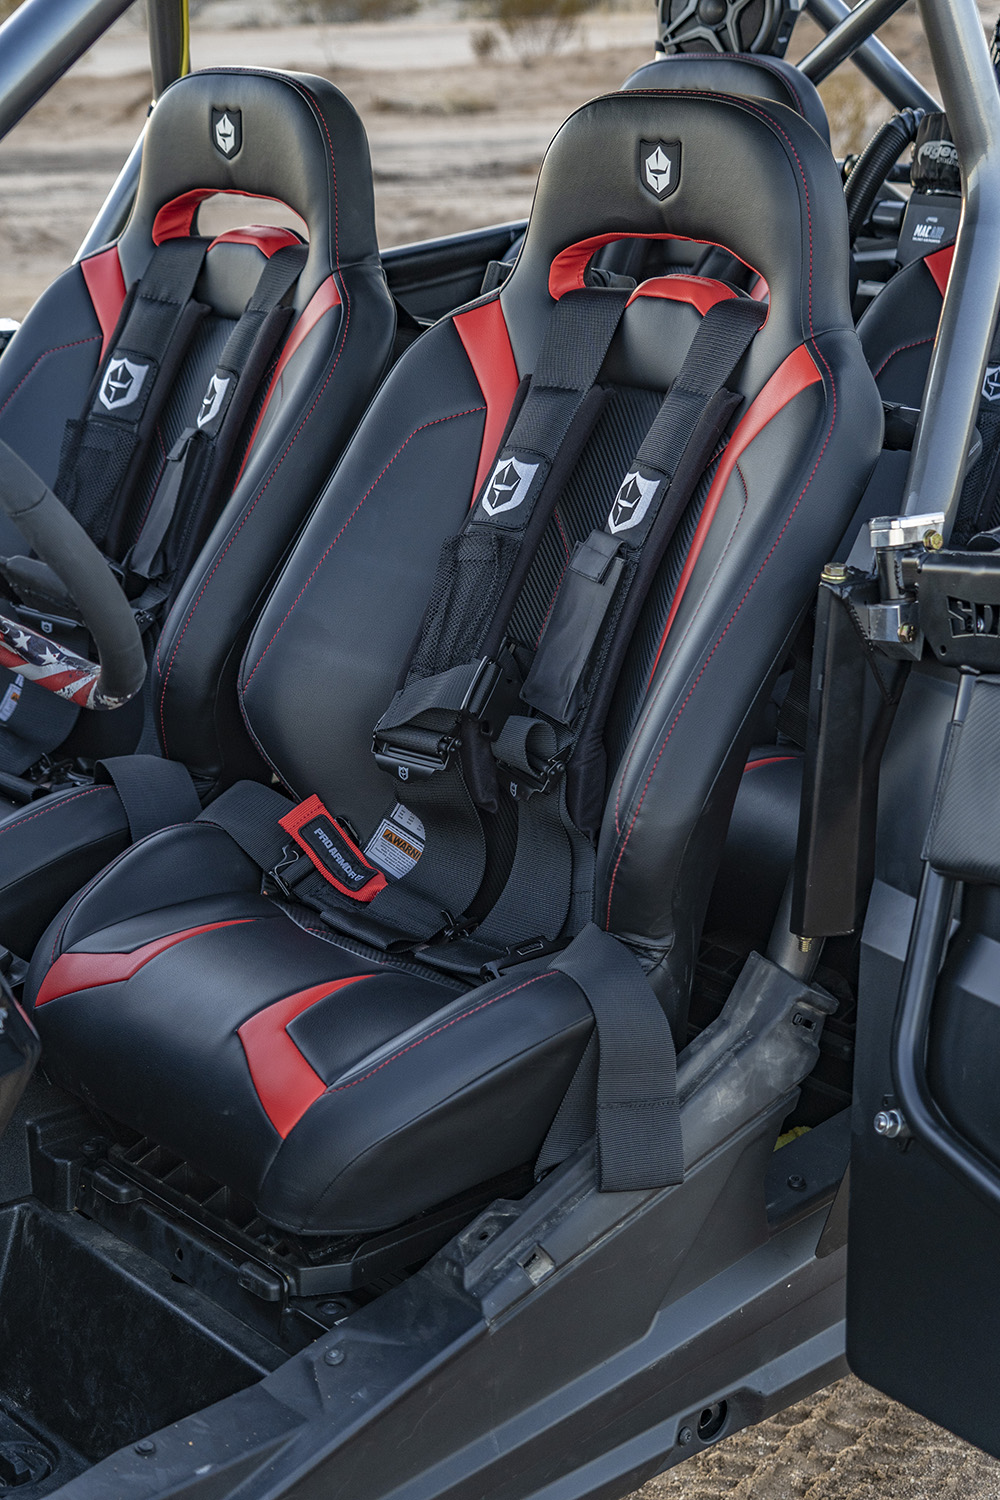
To add some more occupant comfort, we went with Pro Armor’s LE suspension seats and 4-point 3-inch seatbelts. The suspension seats hold you in much better than the stock seat, but are not as deeply bolstered as a racing seat. This makes getting in and out of the car easier. If we planned on racing and running this car hard, we would have optioned a deeper seat, but for weekend excursions, spirited desert drives and exploring with family, the Pro Armor seats strike a good balance. Comfort from the 3-inch wide padded harnesses is excellent, and the adjustment mechanisms and buckles work well. In the rear seats, we went with a 2-inch wide 4 point harness, as we planned on only putting smaller humans in the tight back seat of the Turbo S 4.
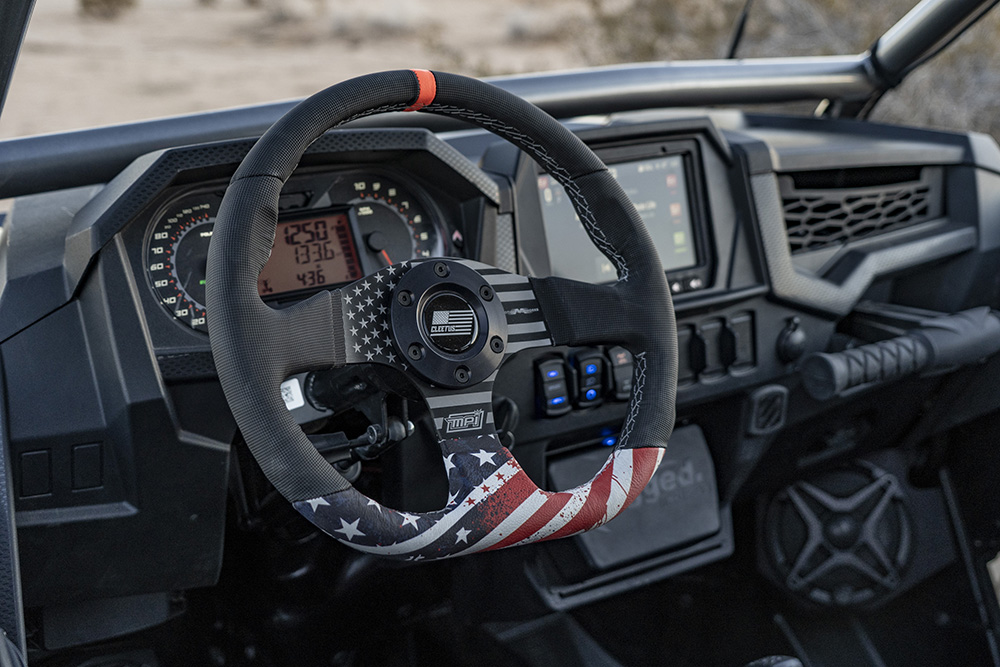
Adding a custom touch (and a little Hell Yeah Brother!) to the driver’s compartment is a Motion Raceworks Cleetus Edition steering wheel. The wheel bolts right up to the stock steering column of the Turbo S, making the swap fairly simple as long as you can get the factory torx-head bolts loose. To tie up the rest of the interior, we used some accessories from Rugged Radios like their flush-mount intercom jacks to hide all the wires and route everything to the center console of the RZR. We mounted the Mac Air variable speed controller between the front seats, just behind the jack ports where you plug your helmet or headset into the intercom cable.
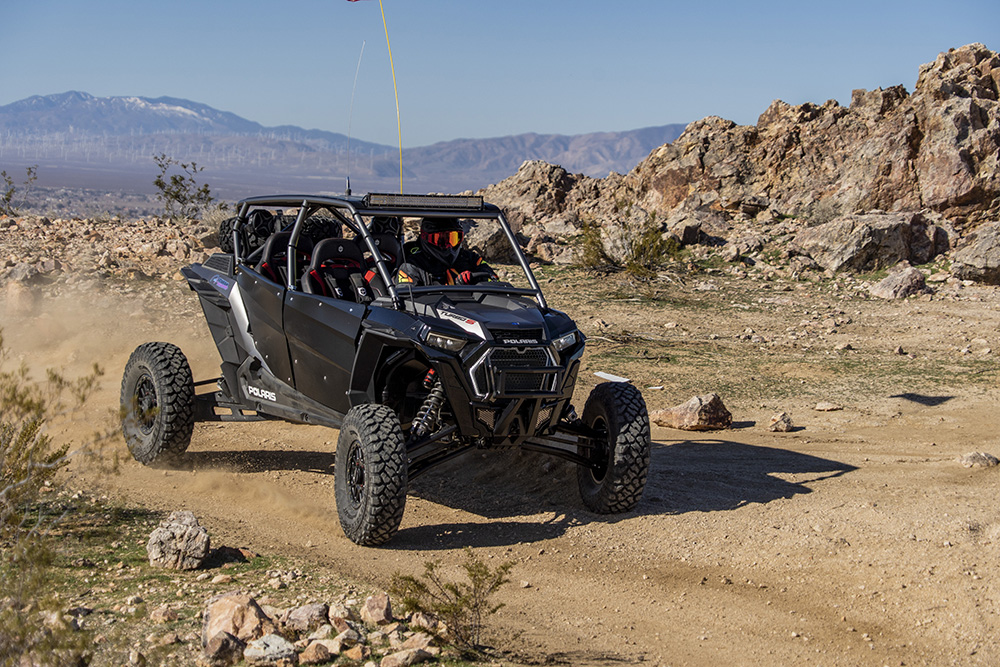
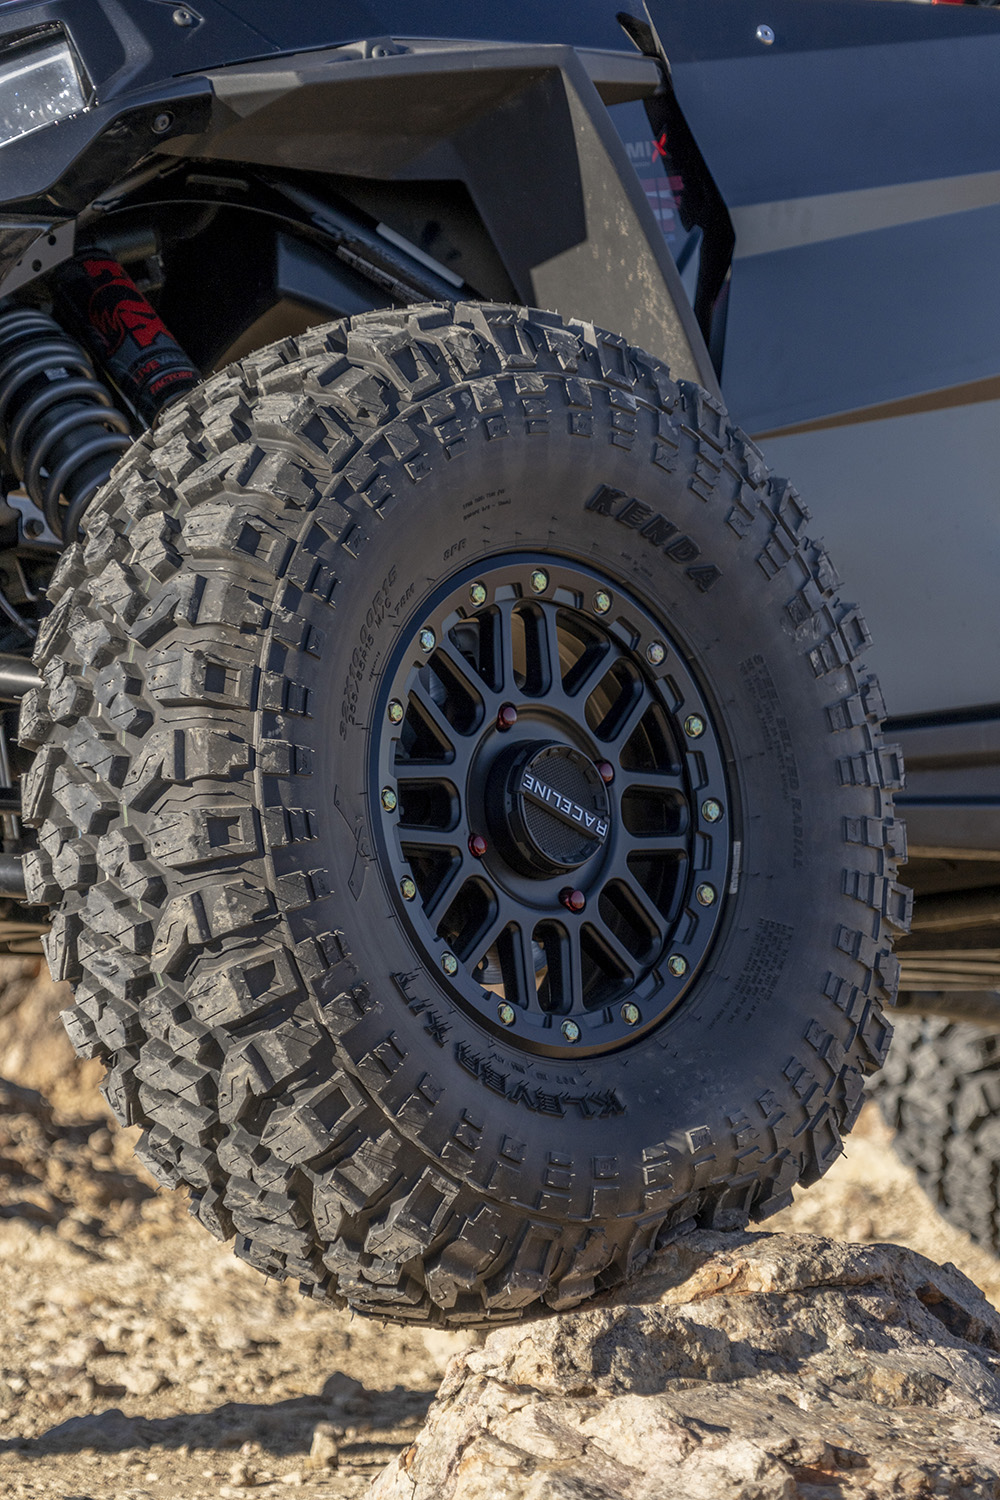
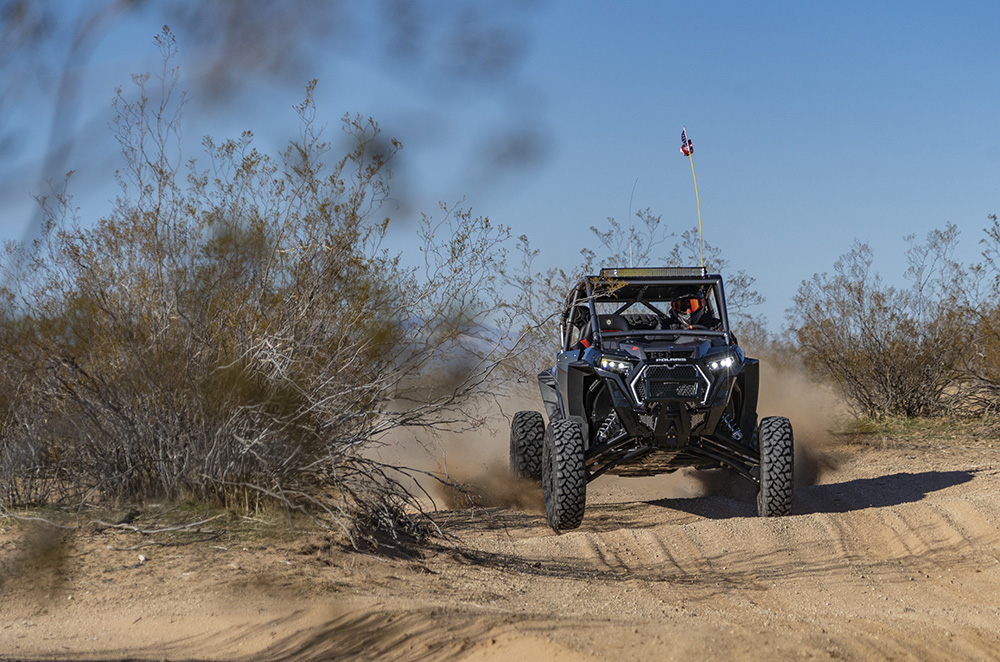
The final step of the build was bolting on this gorgeous set of Raceline A93B beadlock wheels wrapped in 32-inch Kenda Klever XT rubber. Check back in a future issue for an in-depth look at this tire and wheel combo. The Raceline wheels require slimmer lug nuts than the OEM ones that come on the Turbo S, so we optioned for a set of red splined lug nuts from Rad Parts.
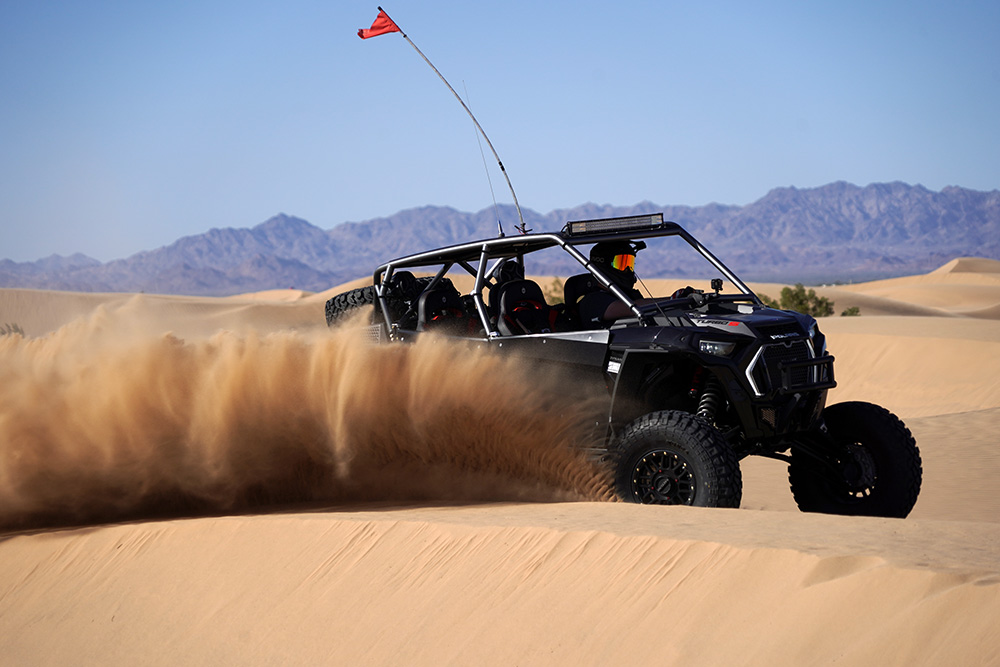
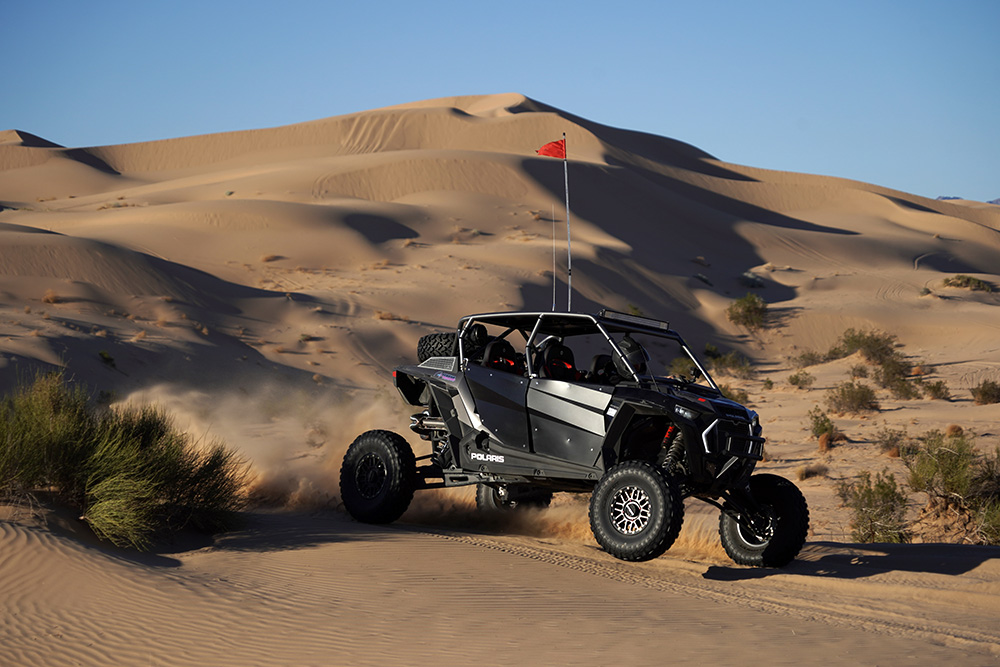
With the build all wrapped up, we set out for some dune and desert play all over Southern California. The Turbo S 4 offers an incredible suspension package from the factory, with three suspension modes to choose from: Comfort, Sport, and Firm. It filters out bumps, whoops, and jumps wonderfully, making this car a blast to drive hard. Check out our full review of this exact car in stock form here, where you can read about the RZR Turbo S’ upgrades and what makes it so special.
The parts we added to this build were chosen based on how we have set up our own personal UTVs in the past. You don’t always need every accessory available- sometimes, choosing your parts based on an end goal and a target makes more sense. We set out to make the already-competent RZR Turbo S 4 even more comfortable, safe, and usable during trips with family, friends, and other UTV enthusiasts. The Rugged communications package has come in handy many times, even when communicating during photo and video shoots between driver and photographer. It has allowed us to stay in contact with the other riders in our group as well as our camp, which is always great for peace of mind when you’re out bashing trails all day.
The SSV Works stereo is a great addition to the car that is nearly invisible installed, until you crank the volume up. The 10-inch Kicker subwoofer in the dash enclosure provides incredible bass response, which is needed with all of the engine vibrations and suspension movement felt when driving this car at speed. Audio clarity is also very good, even at high volumes. Our favorite part about the SSV and Rugged parts is that they work with Polaris’ in-dash navigation and media player, Ride Command. You even get the option to toggle sound output to the stereo system or the intercom, which is a great feature. There are enough rich electronic features in this car to satisfy any tech nut.
This RZR Turbo S 4 has been a pleasure to build and drive, with a couple of us fighting for the keys to take it out on weekend excursions. We have had a lot of great trips in Turbo S models over the years, and we are sad to see them go, but a recent drive in a RZR Pro R 4 has shown us that once again, Polaris intends on moving the market forward. However, just like automotive classics, newer doesn’t always mean more fun. For a lot of us, the RZR Turbo S will continue to occupy a spot in our hearts as one of the best desert UTVs ever built.
Polaris RZR Turbo S Final Build Sheet:
VEHICLE: 2021 Polaris RZR Turbo S 4, $31,999
WHEELS: Raceline A93B Podium Beadlock, $309.00 each
TIRES: Kenda K3204R Klever XT Tires
SUSPENSION: Stock
CAGE: SDR Motorsports Sport Shorty, $2,329.98
GRILLE: SDR Motorsports, $189.99
BED GRILLES: SDR Motorsports, $89.99
DOORS: SDR Hi-Bred Door Kit, $799.99 front, $799.99 rear
REAR RACK: SDR Adventure Rack / Tire Carrier, $599.99
DOOR BAGS: SDR Motorsports Hi-Bred Door Storage Bags, $189.99 front, $189.99 rear
BED BAGS: SDR Motorsports Adventure Rack Bag, $199.99, Hi-Bred Bed Bag, $249.99
BUMPER: SDR Motorsports Baja Series, $349.99
POWDERCOAT: SDR Motorsports, $559
EXHAUST: HMF Titan Dual Slip-On, $859.95
SEATS: Pro Armor LE Suspension Seats, $449.95 each
HARNESSES: Pro Armor 4 Point 3” Harness (front), $129.95 each, 4 Point 2” Harness (rear), $99.95
RADIO/INTERCOM KIT: Rugged Radios RZR Communications Kit, $2,043.00 (4 seat with helmet kits)
HELMET AIR: Rugged Radios Mac Air 4P Kit, $430.00, Mac-XC Magnetic attachments, $164.98 each
STEREO: SSV Works RZ4-5ARC, $2,249.99
STEERING WHEEL: Motion Raceworks Cleetus Edition Limited 13” Off-Road Wheel, $319.00